Foreword
This tutorial is meant to learn about using HTCondor on the Biochemistry Computational Cluster (BCC).
The BCC runs under Linux and therefore all examples will be shown for this operating system. The command-line is bash.
As a general guide, some marks are placed along most of the tutorials to indicate action to be taken by the reader. The $ is the prompt and should not be copied.
Often typewritten styled text illustrates a software output.
This is a very short description of the Biochemistry cluster and HTCondor.
Further information about creating job submission files should be studied within the HTCondor online manual.
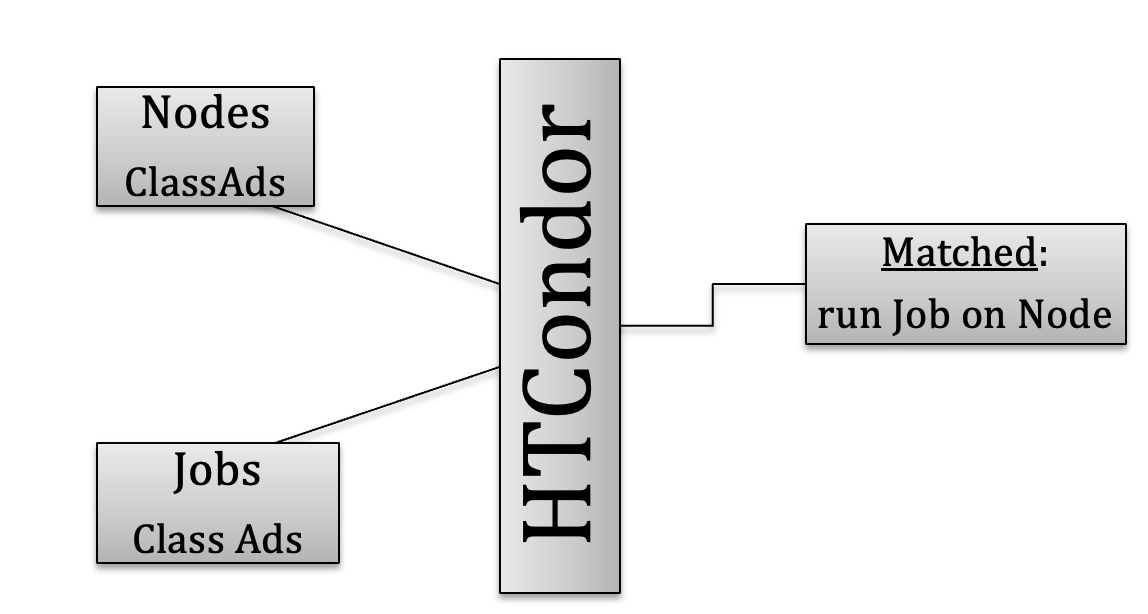
What is HTCondor?
HTCondor is a “scheduler” system that dispatches compute jobs to one and up to a very large number of “compute nodes” that actually perform the calculations.
HTCondor is developed by the Computer Sciences Department at the University of Wisconsin-Madison. The HTCondor web page1 contains a long description. Here is the first, summary-like paragraph:
Abstract
HTCondor is a specialized workload management system for compute-intensive jobs. Like other full-featured batch systems, HTCondor provides:
- a job queueing mechanism,
- scheduling policy,
- priority scheme,
- resource monitoring, and.
- resource management.
Users submit their serial or parallel jobs to HTCondor, HTCondor places them into a queue, chooses when and where to run the jobs based upon a policy, carefully monitors their progress, and ultimately informs the user upon completion.
Warning
Note: Using HTCondor is the only approved method for performing high throughput computing on the BCC Linux cluster.
Jobs have to be ready to be processed by HTCondor as jobs cannot be interactive on the cluster.

Note: The HTCondor software was known as 'Condor' from 1988 until its name changed in 2012.
Cluster access overview
The Biochemistry Computational Cluster (BCC) is a High Throughput Computing (HTC) environment within the UW-Madison Biochemistry Department. HTC provides rapid, parallel computing on a large number of small jobs.
Note: this is different from High Performance Computing (HPC) which allows computation on large datasets in large memory footprints.
If you require HPC rather than HTC, or if you are not part of the Biochemistry department, you may obtain a free account at the “Center for High Throughput Computing (CHTC)” at http://chtc.cs.wisc.edu:
“Standard access to CHTC resources are provided to all UW-Madison researchers, free of charge.”
Text-based access
The BCC cluster must be accessed via secure shell (ssh) with a text-based Terminal from a local computer. There is NO GUI interface available. For example:
- Macintosh:
/Applications/Terminal - Linux: Terminal or Shell
- Windows: install free software e.g.
PuTTYorMobaXterm
Note: The "submit" node is the only computer accessible to users, and jobs will be passed on to the larger hardware portions of the cluster that are not accessible directly to users.
The text-based commands used is bash

No graphical interface (X11)
Important note: there is no graphical user interface (GUI) available in any form as the X11 graphical base is not installed on the operating system.
Therefore, the only mode of action is via text-based access as described above.
Note: The ssh modifier -Y would not allow GUI either.
VPN access
Access from outside the Biochemistry department requires a VPN connection:
Tip
If connecting from outside the Biochemistry department it will be necessary to connect via a Virtual Private Network (VPN) to mimic local presence.
Please refer to the following resources to install and activate VPN: General University description:
it.wisc.edu/services/wiscvpn
Login info
From a text-based terminal use ssh to login:
ssh myname@submit.biochem.wisc.edu
where myname is your NetID. Your NetID Password will be required after you press return.
For more information about NetID see:
• Activating Your Account: https://kb.wisc.edu/page.php?id=1140
• Getting authorized for BCC access: email Jean-Yves Sgro: jsgro@wisc.edu
Login Splash Screen
After login you will see the following screen:
*******************************************************************************
*        Welcome to the UW-Madison Biochemistry Computational Cluster         *
*                                                                             *
*     USE /scratch FOR JOB DATA! DO NOT STORE DATA IN YOUR USER FOLDER!!!     *
*    MOVE YOUR RESULTS TO OTHER STORAGE AFTER YOUR JOB COMPLETES, ALL DATA    *
*              MAY BE REMOVED BY ADMINISTRATORS AT ANY TIME!!!                *
*                                                                             *
*              This computer system is for authorized use only.               *
*                                                                             *
*    You must receive permission to access this system. Please contact the    *
*    Biochemistry Computational Research Facility for training and access.    *
*                     https://bcrf.biochem.wisc.edu/bcc/                      *
*******************************************************************************
Linux OS: CentOS
There are many Linux versions. On the BCC the version installed is called “CentOS” which is derived from “Red Hat Linux.”
The version installed can be obtained with the command:
CentOS Linux release 7.9.2009 (Core)
The uname command can be used to obtain further information with -a printing all info:
Linux biocwk-01093l.ad.wisc.edu 3.10.0-1160.45.1.el7.x86_64 \#1 SMP Wed Oct 13 17:20:51 UTC 2021 x86_64 x86_64 x86_64 GNU/Linux
Noteworthy: x86_64 means it is a 64 bit system and el7 means “Enterprise Linux version 7” meaning that it is derived from the Enterprise Linux 7 version from the company Red Hat.
| Logo | Name | Link |
|---|---|---|
CentOS |
https://www.centos.org |
|
redhat |
https://www.redhat.com |
Before you begin
Using HTCondor requires knowledge of the Linux/Unix Shell bash command-line and information about how the cluster is set-up.
There are many preparation steps that will take time to organize. The first question to ask is “Why do I need to use the BCC and therefore HTCondor?” and validate for yourself the reasons why that would make things better for your computation.
If you decide that HTCondor will be useful, you will then need to evaluate how the software you want to use can work on the BCC Linux cluster. It may also be required that you “compile” the software yourself. There is no pre-installed software other than the Linux OS itself.
Jobs running on BCC can take advantage of the /scratch directory as the local HTCondor is aware of its existence. However, that would not apply to jobs sent outside of the cluster.
Jobs have to be able to run in “batch” mode i.e. non-interactively. This means that you need to know what the software will require to run, such as input file(s) or ancillary data files.
Summary
Summary of what you need & need to know.
This will be reviewed further:
Username: Your UW-Madison NetID username and password.
Login to: submit.biochem.wisc.edu.
Cluster: Understand that /scratch is the main work place.
bash shell: Understand commands such as cd, ls, mkdir, etc.
Software: Understand all requirements of the software to run.
The BCC Linux cluster
Overview
The Biochemistry Computational Cluster (BCC) is a High Throughput Computing (HTC) environment within the UW-Madison Biochemistry Department.
The cluster can be described as a set of 10 computers connected to each other and sharing a common disk space allocation. As these are not really computers with a keyboard, a mouse and a screen they are typically referred to as “nodes.”
Only one node is accessible directly to users to submit jobs to the other 9 nodes. This node is called the “Submit Node” which also plays a role in job control. One could view the set-up in this simplified hierarchy:
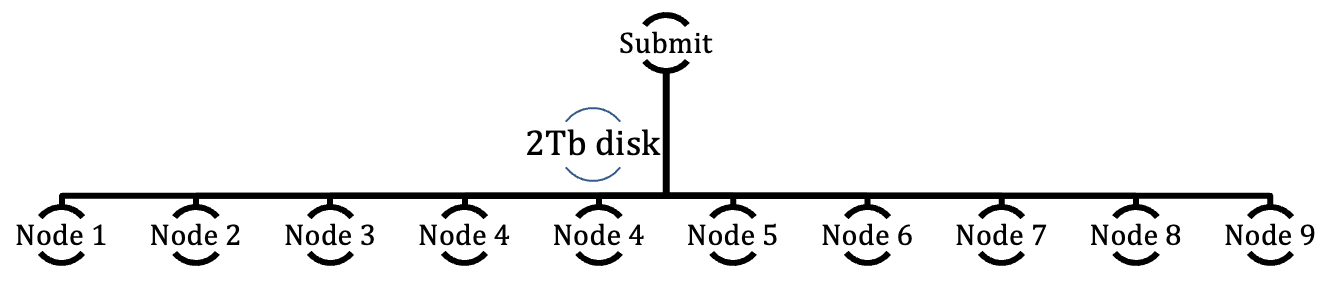
Therefore all jobs and interaction have to go through the Submit node that will dispatch jobs, or job portions to other nodes. This means that the required calculations have to run in batch, non-interactive mode.
The Submit node controls 2 Tb of disk space made available and shared with the other nodes. Each compute node also has a 240 Gb of space to use while performing calculations and is therefore not useable as storage space.
The compute nodes are also equipped with state-of-the-art graphics chips (GPU) that can be specifically requested for calculations by software that are GPU-aware and can greatly accelerate calculations. However, note that some software require specific GPU architecture. Since computations are not to occur on the submit node, this computer does not have a GPU.
The hardware specific data for the cluster is as follows:
Submit Node
- 2 x Intel Xeon E5-2650v2 8-Core 2.60 GHz (3.4GHz Turbo)
- Over 2TB of SSD based RAID 5 scratch disk space shared with each BCC computational node
- 128 GB DDR3 1866 ECC/REG Memory
- 10G Ethernet networking
9 x Dedicated Computation Node
- 2 x Intel Xeon E5-2680v2 10-Core 2.80 GHz (3.60GHz Turbo)
- 64 GB DDR3 1866 ECC/REG Memory
- 1 x NVIDIA Tesla K20M GPU
- 1 x 240 GB SSD
- 10G Ethernet networking
Connecting to the cluster
Only the “Submit Node” is accessible to users via a text-based terminal connection with the secure shell command:
Login with ssh myname@submit.biochem.wisc.edu where myname is your NetID and your Password will be required after you press return. You need to be authorized to access BCC.
Disk space, home directory, /scratch
The default home directory is mapped according to the username and has a long, default name reflecting how the NetID username is “mapped” to the BCC cluster.
If myname represents NetID the default $HOME directory will be mapped as shown below after a pwd command:
/home/myname@ad.wisc.edu
Tip
Important note: the default $HOME directory should NOT be used as the primary location for storage, or for HTCondor job submission. HTCondor cannot "see" your home directory
The main work area is called /scratch and should be used for all jobs.
In addition, HTCondor cannot “see” your home directory but is aware of the /scratch Directory.
HTCondor nodes are set-up in similar ways, and typically they all understand the shared disk space known as /scratch
Warning
Each user should therefore create a working directory within /scratch and work from there rather than the default $HOME directory.
File servers
File server research.drive.wisc.edu is accessible from within the cluster as “mounted” volumes within /mnt/rdrive/labname where labname is the name of the lab.
These mounted volumes are not visible by HTCondor.
See Moving files on and off the cluster.
Process
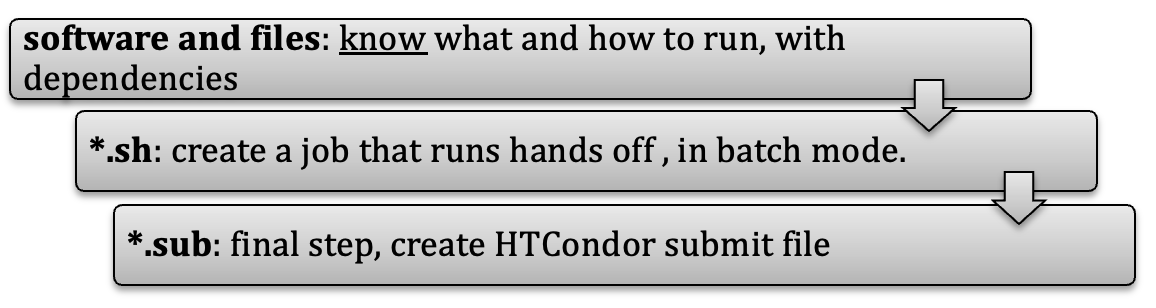
The fundamental process consists of submitting a “job file” that contains information on how to run the software that needs to be run with all optional input and ancillary files.
Typically, one would need to create a shell script (*.sh) that can run the desired software, and then create another, submit script (*.sub) that would submit the shell script to HTCondor that will schedule the job.
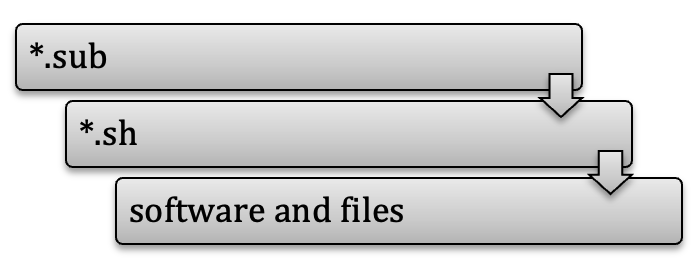
After the run has completed successfully provisions exists within the *.sub file to transfer all created files to e.g. back to /scratch.
Getting ready
To get ready you need to evaluate what was just mentioned in the Process paragraph above backwards:
HTCondor file transfers
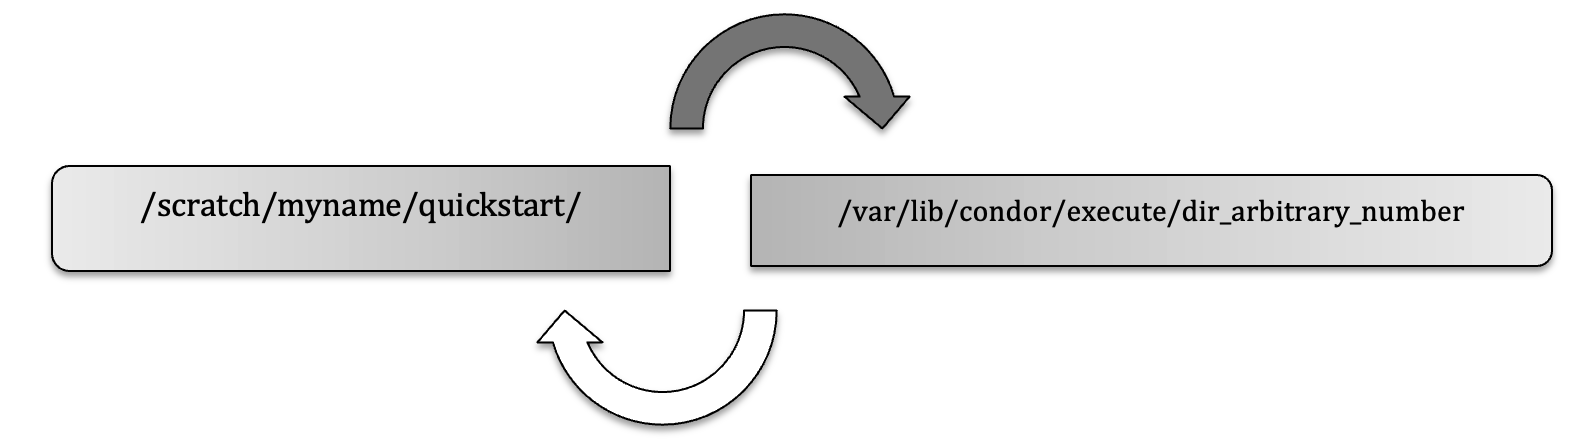
Part of the HTCondor method is to transfer files (sometimes all files and software binaries) to a temporary directory, run the job and copy the output files back to your permanent working directory (e.g. on /scratch) upon completion.
HTCondor runs on a temporary directory that changes every time. For example, this directory could be called:
TMPDIR=/var/lib/condor/execute/dir_30471
This directory and all its files will disappear once the job is done. For the next job the directory would have a different name.
When the job starts, all the necessary files (e.g. hello.sh, hello.sub) are transferred to a temporary directory (dark arrow.) When the job is done, output files created by the job are transferred back to the originating (or specified) directory (white arrow.)
Beyond local cluster: Flocking
When jobs are big, it may be useful to access computers that are beyond that of the Biochemistry cluster itself.
This can be done safely even with proprietary software as files are invisible to others and cannot be copied.
Sending files outside of BCC is a special case called “Flocking” and it may be necessary to adjust the submit command file to either be more “generic” or provide more details of files to be transferred, for example files that are not standard on other systems.
In particular the /scratch directory would not be visible on these other computers and therefore cannot be used.
See also the Center for High Throughput Computing (CHTC) at http://chtc.cs.wisc.edu
QuickStart
(see QuickStart section...)
Resources / Help
Now that you know how to log-in and run the simplest job, here are resources to go further and learn how to use HTCondor with your own software.
On-line resources:
| Resource | Link |
|---|---|
| HTCondor Quick Start Guide | http://research.cs.wisc.edu/htcondor/manual/quickstart.html |
| Complete manual (*) | http://research.cs.wisc.edu/htcondor/manual/ |
(*) You can check which manual you need by checking which version of HTCondor is installed with command: condor_version (see above.)
Tip
It is highly advised to get acquainted with some of this material before attempting any complex calculations on the cluster.
Info
For general HTCondor questions contact chtc@cs.wisc.edu.
For Biochemistry related questions contact jsgro@wisc.edu.
For general Biochem IT/network issues contact helpdesk@biochem.wisc.edu.
HTCondor concepts
We have already learned perhaps the most important command which is the one use to submit a job: condor_submit
The list of HTCondor commands is rather long: about 70. However, for most users and everyday use just a few are essential, for example to start, stop, hold, restart, and list submitted jobs.
Class Ads
Note
From HTcondor manual:
Before you learn about how to submit a job, it is important to understand how HTCondor allocates resources.
ClassAds in HTCondor are comparable to classified ads in a newspaper. Sellers advertise what they sell; buyers may advertise what they wish to buy; both buyers and sellers have specifics and conditions.
Compute nodes ClassAds actively advertise lists of attributes and resources available. For example: the type of CPU (Intel) and its speed, memory (RAM) available, operating system (Linux, Mac, Windows) etc.
Therefore, jobs can be submitted with either generic or very stringent requirements, via a specific syntax within the *.sub submit file.
For example, a user may require that the compute node be equipped with a graphical processor unit (GPU) and a minimum amount of RAM, for example 64Mb, but with a preference for 256Mb is possible. Many other requirements can be added, depending on the software to be run by the job.
ClassAds advertised by both nodes and jobs are continuously read by HTCondor that will match requests and verify that all requirements for both ClassAds are met.
The HTCondor command condor_status provides a summary of the ClassAds in the pool:
condor_status -avail |
shows only machines which are willing to run jobs now. |
condor_status -run |
shows only machines which are currently running jobs for your username. |
condor_status -help |
provides a list of many other options. |
condor_status -long |
lists the machine ClassAds for all machines in the pool. But the output is very long: about 100 ClassAds per compute node. |
Here are a few lines from a -long command, truncated on both ends. This command will report all information for all cpus of all nodes and would output a total of 69,604 lines!)
A few useful information such as memory or Linux OS are shown in bold below:
[truncated above]
LastUpdate = 1527862877
LoadAvg = 1.0
Machine = "cluster-0001.biochem.wisc.edu"
MachineMaxVacateTime = 10 * 60
MachineResources = "Cpus Memory Disk Swap GPUs"
MAX_PREEMPT = ( 3 * 3600 )
MaxJobRetirementTime = MAX_PREEMPT * TARGET.OriginSchedd == "submit.biochem.wisc.edu"
Memory = 1024
Mips = 27186
MonitorSelfAge = 2159646
MonitorSelfCPUUsage = 1.720120371398834
MonitorSelfImageSize = 80268
MonitorSelfRegisteredSocketCount = 39
MonitorSelfResidentSetSize = 10100
MonitorSelfSecuritySessions = 122
MonitorSelfTime = 1530022493
MyAddress = "<128.104.119.168:9618?addrs=128.104.119.168-9618+[--1]-9618&noUDP&sock=1782_e1db_3>"
MyCurrentTime = 1530022541
MyType = "Machine"
Name = "slot1_1@cluster-0001.biochem.wisc.edu"
NextFetchWorkDelay = -1
NiceUser = false
NumPids = 1
OfflineUniverses = {  }
OpSys = "LINUX"
OpSysAndVer = "CentOS7"
OpSysLegacy = "LINUX"
OpSysLongName = "CentOS Linux release 7.5.1804 (Core)"
 [truncated here]
The list contains about 100 attributes “advertised” continuously in order to match jobs with nodes.
Here are output examples (shortened by the |head command limiting output to 5 lines)
Name               OpSys      Arch   State     Activity LoadAv Mem    ActvtyTime

slot1@cluster-0002 LINUX      X86_64 Unclaimed Idle      0.170 42887 30+00:18:21
slot1_10@cluster-0 LINUX      X86_64 Claimed   Busy      1.000  512  3+23:01:35
slot1_11@cluster-0 LINUX      X86_64 Claimed   Busy      1.000  512  3+23:01:35
Name               OpSys      Arch   State     Activity LoadAv Mem    ActvtyTime

slot1@cluster-0002 LINUX      X86_64 Unclaimed Idle      0.170 42887 30+00:18:21
slot1@cluster-0003 LINUX      X86_64 Unclaimed Idle      0.000 43911 30+00:30:36
slot1@cluster-0004 LINUX      X86_64 Unclaimed Idle      0.000 39303 30+00:22:31
Summary
ClassAds reflect the resources of compute nodes and the requirements of user jobs.
HTCondor matches requirements from both.
Universes
Info
From the HTCondor manual:
HTCondor has several runtime environments (called a universe) from which to choose. Of the universes, two are likely choices when learning to submit a job to HTCondor: the standard universe and the vanilla universe.
HTCondor supports different execution environment called universe:
A universe in HTCondor defines an execution environment. HTCondor Version 8.6.11 supports several different universes for user jobs:
- standard
- vanilla
- grid
- java
- scheduler
- local
- parallel
- vm
- docker
=On the BCC the default universe is Vanilla and other choices would be specified in the submit description file. Universes other than Vanilla require specific considerations that will not be mentioned in this document.
Note: While it is the default it is considered good practise to specify the universe within the submit file as the default could be changed at a later date by the system administration of the compute cluster, or could be different on another computer you might use.
Steps before running a job
This was discussed in a previous section (see Process on page 14) and reviewed here in the light of information from the manual.
Code preparation. Jobs must be able to run in batch, non-intereactive mode. A program that runs in the background will not be able to do interactive input and output. HTCondor can redirect console output (stdout and stderr) and keyboard input (stdin) to and from files for the program (these standards are part of the operating system.) Create any needed files that contain the proper keystrokes needed for software input. Make certain the software and scripts run correctly with the files.
HTCondor Universe. The Vanilla universe is the default. The Standard universe requires explicit recompilation of the software with HTCondor libraries and is for advanced users.
Submit description file. This plain text file contains details of the job to run, what software (executable) to run, and information about files to transfer, etc. The file can contain explicit requirements that HTCondor will match with compute nodes in terms of ClassAd.
Submit the job. The command condor_submit is used to submit the job described in the job description file.
Once submitted, HTCondor does the rest toward running the job. Monitor the job’s progress with the condor_q and condor_status commands.
You may modify the order in which HTCondor will run your jobs with condor_prio.
You can remove a job from the queue prematurely with condor_rm.
Log file. It is recommended to request a log file for the job within the submit file. Exit status (success or failure) and various statistics about its performances, including time used and I/O performed will be included in the log file.
Requirements and Rank
Using the requirements and rank commands in the submit description file is powerful, flexible and requires care. Default values are set by the condor_submit program if these are not defined in the submit description file
For example, the following commands within a submit description file:
require HTCondor to run the program on machines which have at least 32 Mb of physical memory, and the rank command expresses a preference to run on machines with more than 64 Mb.
The commands can use comparison operators: <, >, <=, >=, and == are case insensitive and special comparison operators =?= and =!= compare strings case sensitively.
Please refer to the complete HTCondor manual for more details on the usage of these commands.
File transfer
The HTCondor manual has more details on this subject and should also be consulted.
Jobs with Shared File System
HTCondor is aware of the files present in the /scratch directory (see above) since the BCC has a shared file system to access input and output files.
Defaults requirements exist so that compute nodes can share the same data. If you place your data in e.g. /scratch/myname/somedirectory it should be visible by any compute node to run your job.
File Transfer Mechanism
While the BCC offers a shared file system, there are situations when it may still be appropriate to proceed as if that was not the case, for example if the job is very large and one wants to “flock” the job to a larger grid at CHTC or even the Open Science Grid. In this case a shared file system would not be available to computers outside of the local area.
Info
From the HTCondor manual:
The HTCondor file transfer mechanism permits the user to select which files are transferred and under which circumstances. HTCondor can transfer any files needed by a job from the machine where the job was submitted into a remote temporary directory on the machine where the job is to be executed.
HTCondor executes the job and transfers output back to the submitting machine. The user specifies which files and directories to transfer, and at what point the output files should be copied back to the submitting machine. This specification is done within the job’s submit description file.
To enable the file transfer mechanism, place two commands in the job’s submit description file: should_transfer_files and when_to_transfer_output.
By default, they will be:
Setting the should_transfer_files command explicitly enables or disables the file transfer mechanism. The command takes on one of three possible values:
- YES
- IF_NEEDED
- NO
Specifying What Files to Transfer: If the file transfer mechanism is enabled, HTCondor will transfer the following files before the job is run on a remote machine:
- the executable, as defined with the executable command
- the input, as defined with the input command
If the job requires other input files, the submit description file should utilize the transfer_input_files command as a comma-separated list.
File Paths for file transfer
Info
From the HTCondor manual:
The file transfer mechanism specifies file names and/or paths on both the file system of the submit machine and on the file system of the execute machine. Care must be taken to know which machine, submit or execute, is utilizing the file name and/or path.
See manual for more details. Files can also be transferred by URL (http) e.g. using the wget command.
Managing jobs
Once a job has been submitted HTCondor will attempt to find resources to run the job (match the ClassAd from the job requirements with those advertised by the compute nodes.)
Specific commands can be used to monitor jobs that have already been submitted.
A list of submitted jobs, by whom, can be obtained with:
Job progress can be assessed with:
This job ID provided by the previous command condor_q can be used to remove that job if it not longer needed, for example of the ID is 77.0 the command would be:
The job would be terminated and all files discarded.
Jobs can be placed on hold and then released with the commands specifying the job ID:
A list of jobs in the hold state can be obtained:
or the reason for their holding:
If a job is not running, wait 5 minutes so that ClassAd have been negociated, and then check with the command: (see more in the manual.)
Finally, some jobs may be able to have their priority altered by the condor_prio command.
Job completion
Info
From the HTCondor manual:
When an HTCondor job completes, either through normal means or by abnormal termination by signal, HTCondor will remove it from the job queue. That is, the job will no longer appear in the output of condor_q, and the job will be inserted into the job history file.
Examine the job history file with the condor_history command. If there is a log file specified in the submit description file for the job, then the job exit status will be recorded there as well.
Statistics about the job will be included in the log file if it was requested within the submit file, as it is strongly suggested.
Tag file names with job or process
There are methods to tag the name of files by job name, process number, the compute node or the cluster name as a command within the submit file. For example:
The commands of the style $(name) are the method that HTCondor handles variables with proper set-up.
Example: environment variables
Here is a small example putting things together with a submit and executable file.
environ.sub submit file:
    executable = run_environ.sh
    output = run_environ_$(Cluster).out
    error  = run_environ_$(Cluster).err
    log    = run_environ_$(Cluster).log
    should_transfer_files = YES
    when_to_transfer_output = ON_EXIT
    request_cpus =1
    queue 1
run_environ.sh executable file:
submit the job:
Submitting job(s).1 job(s) submitted to cluster 3775.
We can see the status of the job:
-- Schedd: submit.biochem.wisc.edu : <128.104.119.165:9618?... @ 06/26/18 09:39:33
OWNER BATCH_NAME             SUBMITTED   DONE   RUN    IDLE  TOTAL JOB_IDS
jsgro CMD: run_environ.sh   6/26 09:38      _      _      1      1 3775.0

1 jobs; 0 completed, 0 removed, 1 idle, 0 running, 0 held, 0 suspended
The job runs quickly and the result files are transferred back, as shown with this list:
environ.sub             run_environ_3775.out
run_environ_3775.err  run_environ.sh
run_environ_3775.log  test.out
The executable file (run_environ.sh) created a standard output that captured within file run_environ_3775.out and will contain a single line with “this is running!”
The file test.out created by the executable will contain the directory name on the compute node and then the values of environment variables:
/var/lib/condor/execute/dir_6663
_condor_stderr
_condor_stdout
condor_exec.exe
test.out
_CONDOR_JOB_PIDS=
_CONDOR_ANCESTOR_1864=4326:1527864152:618879280
TMPDIR=/var/lib/condor/execute/dir_6663
_CONDOR_SCRATCH_DIR=/var/lib/condor/execute/dir_6663
_CHIRP_DELAYED_UPDATE_PREFIX=Chirp
TEMP=/var/lib/condor/execute/dir_6663
BATCH_SYSTEM=HTCondor
_CONDOR_CHIRP_CONFIG=/var/lib/condor/execute/dir_6663/.chirp.config
_CONDOR_ANCESTOR_4326=6663:1530024011:1517681191
PWD=/var/lib/condor/execute/dir_6663
CUDA_VISIBLE_DEVICES=10000
_CONDOR_AssignedGPUs=10000
_CONDOR_ANCESTOR_6663=6668:1530024013:4039808267
_CONDOR_SLOT=slot1_2
SHLVL=1
_CONDOR_MACHINE_AD=/var/lib/condor/execute/dir_6663/.machine.ad
TMP=/var/lib/condor/execute/dir_6663
GPU_DEVICE_ORDINAL=10000
OMP_NUM_THREADS=1
_CONDOR_JOB_AD=/var/lib/condor/execute/dir_6663/.job.ad
_CONDOR_JOB_IWD=/var/lib/condor/execute/dir_6663
_=/usr/bin/printenv
This example illustrates that the directory where calculations happen is different every time. In this example it is /var/lib/condor/execute/dir_6663.
Transfer of environment: getenv
At BCC we had a situation where a script would fail as a job but ran perfectly fine as an interactive test (at the shell prompt) or as an Interactive HTCondor job. The solution was to add one line to the submit file:
The following explanation was given by CHTC personnel:
Tip
This can happen because the environment is subtly different between the two -- the interactive job inherits all of your usual shell environment, but the batch job doesn't.
To address this, you can use this option in the submit file:
getenv = true
This will emulate the interactive environment in the batch job and hopefully solve your problem there.
In the next section we’ll learn about specifying local library dependencies.
Library dependencies
Software exist in the form of binary files, but often rely also on external “libraries” that are required. In some cases, the software can be compiled specifically to incorporate the libraries within its own binary file in order to eliminate external dependencies. However, this is not always possible and a method to deal with external libraries exist within HTCondor: the LD_LIBRARY_PATH environment variable.
For example:
(replace myname with your directory name; in bash use the export command.)
Question: Why/When would I need this?
On the BCC Linux cluster, you will need to use this method if any of your software is written in the FORTRAN language as the FORTRAN libraries are not available on a default, modern Linux installation.
Note: this is true even if you compile with the "-static" or equivalent option(s) as will be shown in the following, simple example.
FORTRAN 77: Hello World example
Warning
UPDATE: SKIP THIS PARAGRAPH
f77 and g77 are no longer installed on the cluster.
This section is kept here for general information about the use of the LD_LIBRARY_PATH option.
All FORTRAN program to be run on the BCC Linux cluster will require this step.
FORTRAN programs can be compiled with the compilers f77 or g77 each with specific modifiers.
Let’s create a minimal “Hello World!” FORTRAN 772 program that prints to standard output, save it in a file called hello77.f for example:
Then we can compile the program with the mode to request that external libraries be included in the final binary. This “switch” is different for both compiler options:
    $ g77 -fno-automatic hello77.f -o hello77_static_g77
    $ f77 -Bstatic hello77.f -o hello77_static_f77
In practise, the resulting binary has the same size as if the “static” option was not invoked (this can be verified with the Unix command ls -l to list files.)
Running the file interactively within the shell will always work:
Hello, world!
However, running this file with HTCondor on the BCC Linux cluster will cause an error to be reported and the program will FAIL:
./hello77_static_f77: error while loading shared libraries: libg2c.so.0: cannot open shared object file: No such file or directory
This is true for ALL FORTRAN programs. Therefore, there will be a requirement for a SYSTEM library, defined within the *.sh script file. This will tell the executable program where the necessary library is located.
The following example takes advantage to the fact that /scratch is a shared volume. Therefore, after copying the "libg2c.so.0" library to /scratch/myname/lib a minimal script file could be written as:
    #!/bin/bash
    export LD_LIBRARY_PATH=$LD_LIBRARY_PATH:/scratch/myname/lib
    # run the program:
    ./hello77_static_f77
IF there is no shared volume on the cluster, the necessary library or libraries could be placed in a “lib” directory to be transferred with the other files at submission and a relative path could be created. For example:
export LD_LIBRARY_PATH=\$LD_LIBRARY_PATH:./lib
FORTRAN 95: gfortran
gfortran (also called f95 on the BCC Linux cluster) is GNU FORTRAN and is the software to use.
GNU Fortran (GCC) 4.8.5 20150623 (Red Hat 4.8.5-28)
Copyright (C) 2015 Free Software Foundation, Inc.

GNU Fortran comes with NO WARRANTY, to the extent permitted by law.
You may redistribute copies of GNU Fortran
under the terms of the GNU General Public License.
For more information about these matters, see the file named COPYING
The general compilation format is:
Static linking
From the GNU web site3:
Info
gfortran is composed of two main parts: the compiler, which creates the executable program from your code, and the library, which is used when you run your program afterwards. That explains why, if gfortran is installed in a non-standard directory, it may compile your code fine but the executable may fail with an error message like library not found . One way to avoid this (more ideas can be found on the binaries page) is to use the so-called "static linking", available with option -static gfortran then put the library code inside the program created, thus enabling it to run without the library present (like, on a computer where gfortran is not installed). Complete example is:
gfortran -static myfile.f -o program.exe
However, just doing this causes an error on the cluster:
/usr/bin/ld: cannot find -lgfortran
/usr/bin/ld: cannot find -lm
/usr/bin/ld: cannot find -lquadmath
/usr/bin/ld: cannot find -lm
/usr/bin/ld: cannot find -lc
collect2: error: ld returned 1 exit status
We can find the location of the library with4:
    $ gfortran -print-file-name=libgfortran.so
    ```

> `/usr/lib/gcc/x86_64-redhat-linux/4.8.5/libgfortran.so`

Then export LDFLAGS with the above information, <u>without</u> the file name:

```bash
    $ export LDFLAGS=-L/usr/lib/gcc/x86_64-redhat-linux/4.8.5
The specific requirements for libraries do not work in the same way for gfortran and binaries will have a different size if compiled with the necessary switch:
    $ gfortran hello77.f -o hello77_gfortran
    $ gfortran hello77.f -static-libgfortran -o hello77_static_gfortran
We can see that the sizes are different:
    $ ls -l *gfortran | cut -c34-110
       7970 Jun  2 13:17 hello77_gfortran
     158309 Jun  2 13:17 hello77_static_gfortran
A test on the BCC Linux cluster has shown that the gfortran compiled binaries in this simple form do not require any library specifications unlike the files compiled with f77 or g77.
Therefore, which compiler is used makes a difference. However, some program code might be sensitive to the nature of the compiler so this might not be a universal result.
Compiling
Compiling other programs in various languages will require some knowledge on compilation methods and verifying that the appropriate compiler or compilers are installed.
The command "which" can be useful to locate where program are installed if they are present.
Compilers installed on BCC Linux include: gcc, gcc34, cc, c89, c99, c++, g++, g++34, g77, f77, f95, gfortran.
C pre-processors installed: cpp and mcpp.
Standard Universe
The Standard Universe offers advantages to the Vanilla Universe especially for long running computations that may create incremental output files.
However, the software has to be recompiled with the condor_compile command.
Access to the original source or object code is required for this step. If not, this is not possible and the Standard Universe cannot be used.
Read more on the HTCondor manual.5
Compiling R
Since there are no common directories for software each user has to compile their own. Once compiled the software should be moved within the /scratch directory or a subdirectory within.
Download R
The repository for R is “The Comprehensive R Archive Network” or CRAN https://cran.r-project.org/
There are multiple options for Linux, but for redhat there is only a README file. For us we need to download the source code, which we can get from:
https://cran.r-project.org/src/base/R-3/
For example, download R-3.2.5.tar.gz
Install
Most open-source software has a README and an INSTALL file in plain text with information.
Note: the CHTC help pages suggest to use an interactive HTCondor session. However, low impact compilation could reasonably occur on the “submit” node.
Notes:
-
there is no X11 on the cluster, therefore care has to be given to not use X11 during compilation, this is accomplished with
--with-x=no -
To avoid library sharing
--enable-R-shlibwas removed from the default command.
Uncompress:
Then change into the new directory (cd), configure and compile (make):
Here is an example to compile R version 3.2.5:
    cd R-3.2.5
    # Compile R 3.2.5 on 12/12/2016 in /scratch/jsgro/R/
    ./configure --prefix=$(pwd) --with-readline=no --with-x=no

    make
The R and Rscript executables are located in the ./bin directory.
To start R interactively from the R-3.2.5 directory type:
Problem with Zlib in newer version
Starting with version R-3.3.0 there is a newer requirement for zlib which does not seem to be installed on BCC. Therefore, it may be necessary to compile zlib first for these versions.
See for example:
http://pj.freefaculty.org/blog/?p=315https://stat.ethz.ch/pipermail/r-devel/2015-April/070951.html
The first link provides an example to compile zlib.
The second link provides an example to configure differently.
R additional packages
To use R on the cluster additional packages should be added first from e.g CRAN or Bioconductor and the compiled R directory compressed and transferred e.g. with tar.
The added packages will be added in the directory echoed by the R command .Library
In the case of this example, start R (e.g. ./bin/R) , then within the R console:
The compressed tar file should then be part of the files transferred and unarchived by a command contained within the executable (*.sh) file for the job.
It should be sorted out how to transfer the compressed file(s) onto the compute node, uncompress and unarchive them and how to access them.
See for example the section on LD_LIBRARY_PATH above to implement this.
Interactive Jobs
Interactive jobs are now possible on BCC. The default Universe will be Vanilla.
From the manual6:
Info
An interactive job is a Condor job that is provisioned and scheduled like any other vanilla universe Condor job onto an execute machine within the pool. The result of a running interactive job is a shell prompt issued on the execute machine where the job runs. The user that submitted the interactive job may then use the shell as desired, perhaps to interactively run an instance of what is to become a Condor job.
This option may be beneficial for example to compile software (see previous section) without impeding the submit node.
Interactive shell
The simplest command to start an interactive job is:
There may be a delay for the interactive shell to begin depending on the cluster availability.
The interactive shell will be running as an HTCondor job on a compute node rather than the submit node.
Once activated a splash screen of information will be presented. An error about “home directory” not found is normal as HTCondor nodes are only aware of the /scratch directory as explained previously.
Note that the shell will log itself out after 7200 seconds (2hrs) of inactivity.
We now have an interactive bash shell.
/var/lib/condor/execute/dir_36940
_CONDOR_JOB_PIDS=
HOSTNAME=cluster-0005.biochem.wisc.edu
TERM=xterm-256color
SHELL=/bin/bash
HISTSIZE=1000
SSH_CLIENT=128.104.119.165 22309 9618
TMPDIR=/var/lib/condor/execute/dir_36940
_CONDOR_ANCESTOR_28163=36940:1525207142:4203470193
_CONDOR_SCRATCH_DIR=/var/lib/condor/execute/dir_36940
SSH_TTY=/dev/pts/0
USER=jsgro
_CHIRP_DELAYED_UPDATE_PREFIX=Chirp
LD_LIBRARY_PATH=/usr/local/cuda/lib64:
TEMP=/var/lib/condor/execute/dir_36940
BATCH_SYSTEM=HTCondor
_CONDOR_CHIRP_CONFIG=/var/lib/condor/execute/dir_36940/.chirp.config
TMOUT=7200
[truncated]
It is important to note that the environment variables are transferred from the user, including the $HOME directory even if HTCondor cannot access it!
Most importantly the /scratch directory is available:
From this point it will be possible to work to prepare software and files without impacting the submit node.
When done, the shell can be released with the exit command:
logout
Connection to condor-job.cluster-0005.biochem.wisc.edu closed.
File transfer from research.drive.wisc.edu
Moving files on and off the cluster:
Note: older "fs.biochem.wisc.edu", fs2 and similar servers are now defunct.
The current file server is smb://research.drive.wisc.edu that can be mounted on a Mac or PC as a network drive. Therefore files stored on these computers will be available within the cluster.
HTcondor does not see these directories, therefore files of interest have to be either moved onto /scratch or transferred via the .sub command file.
Useful commands
The cp or mv commands can be used to copy or move files.
Adding -r can help to transfer complete directories and their content.
Alternatively, archiving commands can also prove useful such as:
zipandunzipgzipandgunziptar
-
http://research.cs.wisc.edu/htcondor/description.html ↩
-
Examples for many languages can be found at http://en.wikipedia.org/wiki/List_of_Hello_world_program_examples [ARCHIVED 11APR2015; SHORT URL: https://bit.ly/2N3dit8+] ↩
-
https://gcc.gnu.org/wiki/GFortranGettingStarted ↩
-
https://github.com/JuliaLang/julia/issues/6150 ↩
-
http://research.cs.wisc.edu/htcondor/manual/v8.6/2_4Running_Job.html ↩
-
http://research.cs.wisc.edu/htcondor/manual/v8.6/2_5Submitting_Job.html (see section 2.5.13) ↩